Tuesday, January 18, 2011

Show-n-Tell

Just a show-n-tell:

This is the blue version of the Wave Quilts I've been making with grandma's dresses for family members.  Again, you'll see that I added some new fabrics to round things out.  See the red/orange/pink versions as well as the source for the patterns here.
finished quilt 60" by 68"


Friday, January 14, 2011

A new take

Good morning,
Take a look at this eye candy-  these flowers were made by (friend and fellow pattern maker and Modern Quilt guild member) Carolyn Friedlander, using La Todera orchid patterns.  Didn't she take these to a new level with her fabric choices and awesome craftsmanship?
That's just par for the course with Carolyn though.  Take a look at here website and check out her amazing quilts and machine quilting!


Thursday, January 6, 2011

Tumbler-ful of Memories Quilt


Uncle RJ's Quilt


Evenin' all,
Wanted to share with you the details of the quilt I just finished for my Uncle RJ.  This is another in the series of quilts I've been making from my late grandmother Geraldine's dresses.


I'm calling this one the Tumbler-ful of Memories Quilt.  It's a one patch using a tumbler shaped template (see below).  I liked the idea of a glass pattern for a quilt made with her things because Grandma was most definitely a 'glass half full' kind of lady.  Always. Even when life was obviously not.  We miss her so.


click here for free template

So if you'd like to make your own memory quilt, print out the template and start gathering up your materials!  I chose Grandma's dresses that were 100% cotton (a little polyester mix is ok too).  I washed them, cut off all the seams and hems to make flat panels of fabric, and starched and ironed them.  The starching is important to make the well worn fabrics behave!


quilt layout

pieced block

It's hard to say how many garments you'll need, since garments vary in size and amount of usable fabric they will yield.  You'll see here that I pieced several of the blocks since I was down to scraps of certain dresses that I wanted to include.  And that's ok!  Just piece em, iron the seams open, and trace out your blocks. And don't be afraid to throw a few new fabrics in there- I do!  In fact I add up to 1/3 'new' fabrics (from the quilt shop or from other garments) just to tie the whole thing together.


I love, love fusible cotton batting these days.  Plus, you can get it from Michaels or Joann with a coupon!
Remember to press both sides of your quilt sandwich and go over the edges twice for good measure.


outline quilting
more outline quilting

I did very simple machine quilting with variegated thread and a walking foot.  The tumbler sides were outlined 1/4" outside of the seams in vertical lines between the top and bottom of the quilt.  Since in a memory quilt you want to showcase the fabrics, I thought that would be just enough quilting.


binding and backing


Binding was pieced from an XL mens striped shirt.  Backing is a sheet, another great resource for memory quilts (or any quilts for that matter!)


If you haven't tried making memory quilt, please do.  This is even a great project using your kids' clothes since the templates are relatively small.  Please send me your pictures!


Besos, Julie

Tuesday, January 4, 2011

American Quilt Retailer Magazine

Thanks Margaret from Eazy Peazy Quilts for giving me the heads up about the La Todera appearance in American Quilt Magazine!!!! Yay!!!  Also see Margaret's Walker Saddlebag- congrats Margaret!

Tuesday, December 28, 2010

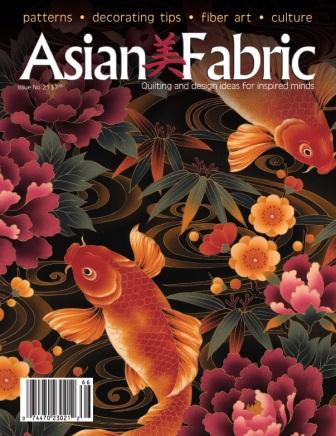
Asian Fabric

Doot- doot-doot!!!  That would be me tooting my own horn...  I'm very proud to announce my first official appearance in a magazine- Asian Fabric Magazine issue #21 to be exact!


I met the editor of this beautiful magazine at the Houston Quilt market.  She asked me if I would be interested in contributing a project for the very next issue, and of course I said yes!!

The project was made from Kona Bay fabrics and ribbon (the ribbons are to die for.)  Here is the project:
"First Snow Ornament"
The ornament is about 6" in diameter ad can be displayed all year round!


Thanks for lookin'!

Saturday, December 25, 2010

Merry Christmas y Feliz Navidad


Happy Holidays to all!

These images from our snow baby scene we put up every year. Each year we add something new- more hand- painted babies, trees, and this year the giant toadstools. Tutorial for toadstools coming soon!


Posted using BlogPress from my iPhone


Monday, December 20, 2010

Snow Globe Birthday Cake for Olivia


This past week was my daugher Olivia's 12th birthday.  (That I can't believe she's already 12 is a whole 'nother post...)  Anyhow, we had a Winter Wonderland themed party for Miss Thang,  and here was her Snow Globe cake.  It was such a hit that all of her friends were taking pictures of the cake with their cellphones before we cut it!

If you would like to make (or I should say assemble ) your own,  you will need:

  • One 10" round layer cake from your local grocery store bakery, frosted light blue and piped in white on the borders, white polka dots on the sides
  • Several plastic snowflakes (these happened to be snowflake rings)
  • Winter scene foam stickers (Michaels)
  • (1) 8" round glass 'Blanda' bowl from Ikea ($4.99. Perfectly round and clear.)
  • Large white round edible non-pareils (from cake section in Michaels) or white sprinkles...

  1. Press plastic snowflakes onto side of cake.
  2. Assemble snow scene with foam stickers.  To make scene look good from all angles, I stuck identical stickers together, back to back.
  3. Accent snow scene with edible round white non-pareils.
  4. Carefully invert bowl over snow scene.
  5. Enjoy the compliments!
This would also make a great anytime cake for a snow globe collector.  Just change the scene inside! 

How about having one of the little characters holding a sign for the recipient?